Signage Board 3D Mockup: Elevating Interior Brand Presentations
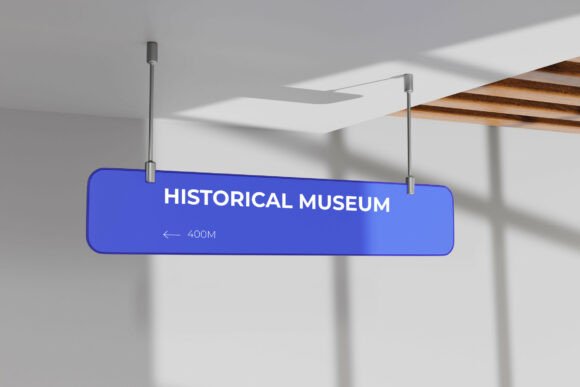
Presenting environmental graphics and wayfinding systems requires more than a flat digital file; it demands context. A high-quality Signage Board 3D Mockup bridges the gap between abstract vector art and physical reality, allowing stakeholders to visualize how branding interacts with architectural space. This specific bold and contemporary mockup features a ceiling-suspended rectangular board rendered in a bright blue finish with natural overhead lighting. It is designed specifically for professionals who need to showcase interior brand identity projects, museum labels, retail store signage, or complex wayfinding systems without the expense of physical prototyping.
For interior designers, brand agencies, and commercial space planners, this tool serves as a critical communication asset. However, possessing a high-resolution PSD is only half the battle. Many creatives undermine their own work by misusing mockup resources, resulting in presentations that look artificial or fail to convey the true scale of the installation. Understanding the technical and aesthetic nuances of this suspended sign environment ensures your portfolio stands out for its professionalism rather than its flaws.
Common Pitfalls in Environmental Signage Visualization
The most frequent error when using a Signage Board 3D Mockup is ignoring the relationship between the graphic design and the simulated physical environment. Because this template features a bright blue finish and natural overhead lighting, it imposes specific constraints on your artwork. A common mistake is placing low-contrast text or dark-colored logos directly onto the blue surface without adjustment. In a real-world scenario, this would result in poor legibility and accessibility compliance issues. When designers fail to account for the base color of the mockup, the final render looks muddy, and the client cannot accurately judge the effectiveness of the signage.
Another overlooked detail involves the suspension mechanism and sightlines. This mockup depicts a ceiling-hung unit, which implies a specific viewing angle and spatial relationship. Beginners often paste their designs flat against the smart object without considering perspective distortion or the height at which the sign will actually be installed. If you are presenting a museum label or retail directory, the text size must be readable from a standing human perspective. Scaling your design to fit the pixel dimensions of the PSD without referencing real-world measurements leads to unrealistic proportions. A sign that looks perfect on a 27-inch monitor may appear comically small or overwhelmingly large when rendered in a 4000 x 3000 pixel space meant to represent a physical corridor or gallery.
Navigating Technical Specifications and File Management
Technical misunderstandings frequently cause frustration during the editing process. This resource includes one PSD file with smart object layers, yet users sometimes attempt to edit the rasterized background instead of utilizing the designated smart objects. Double-clicking the correct layer thumbnail is essential for non-destructive editing. Bypassing this workflow destroys the embedded lighting maps and shadow effects that give the suspended sign its depth. Once these adjustments are lost, recovering the photorealistic quality of the natural overhead lighting becomes nearly impossible without starting over.
Resolution management is equally critical. The included files boast a high resolution of 4000 x 3000 pixels at 300 DPI. This specification supports large-format printing and detailed digital presentations, but it also demands significant system resources. A practical warning for those working on older hardware: always save your source artwork at a matching resolution before placing it into the smart object. Upscaling a 72 DPI web logo to fit a 300 DPI print-ready mockup results in pixelation that no amount of post-processing can fix. Conversely, working exclusively at full resolution can slow down your workflow. A better approach is to test your layout at a lower resolution first, then swap in the high-res assets for the final export.
Users must also remember that all stock images inside are not included. This distinction is vital for avoiding licensing issues. The clean suspended sign environment provided is a stage, not a complete scene. Assuming the background elements are cleared for commercial use can lead to legal complications. Always verify whether you need to license additional architectural photography or if the neutral backdrop provided is sufficient for your specific client deliverable.
Strategic Best Practices for Professional Results
To maximize the utility of this Signage Board 3D Mockup, adopt a workflow that prioritizes realism and clarity. Start by reviewing the included PDF Help File. While experienced Photoshop users may feel comfortable skipping documentation, these guides often contain specific notes about layer organization, color profiles, or hidden features unique to the creator’s setup. Spending five minutes reading the guide can prevent hours of troubleshooting later.
When applying your design, consider the materiality implied by the bright blue finish. This texture suggests a modern, perhaps matte or satin, industrial aesthetic. Your typography and iconography should complement this vibe. For wayfinding systems, ensure your arrows and directional cues align logically with the suspended orientation. If the sign hangs perpendicular to the floor, vertical stacking of information often reads better than horizontal layouts. Test your design in grayscale to ensure the contrast holds up against the colored background before committing to full-color rendering.
- Verify Color Profiles: Ensure your document is set to CMYK if the output is intended for print production approval, or RGB for digital-only portfolios, as the lighting effects may shift between modes.
- Respect the Lighting: The natural overhead lighting creates subtle gradients. Avoid adding artificial drop shadows to your text within the smart object, as this conflicts with the pre-rendered ambient occlusion.
- Contextualize the Scale: Place a reference element, such as a blurred human silhouette or architectural grid line, in your final presentation slide to establish the true size of the suspended board.
- Organize Smart Objects: Rename your smart object layers immediately upon opening the file to maintain clarity, especially if you are iterating through multiple design options for a single client.
Evaluating Suitability Before Downloading
Before integrating this Signage Board 3D Mockup into your project pipeline, assess whether its specific aesthetic aligns with your goals. The bold blue color and contemporary form factor make it ideal for tech companies, modern museums, and upscale retail environments. However, it may clash with heritage brands, rustic interiors, or minimalist white-space aesthetics. Choosing a mockup based solely on resolution rather than stylistic fit creates cognitive dissonance for the viewer. The goal is to sell the signage solution, not the mockup itself.
Additionally, confirm that the 4000 x 3000 pixel dimension meets your delivery requirements. While this size is generous, some large-format architectural visualizations require even higher resolutions. Conversely, if you are creating social media content, this file size may be excessive. Plan your export settings accordingly to balance quality with file manageability. By approaching this resource with intention and technical awareness, you transform a simple PSD into a powerful persuasive tool that accurately communicates value, functionality, and design excellence to your clients.